Your cart is currently empty!
Note: Factory automatically adds 12 inches to your window height for roller wrap at no charge.

Note: Factory automatically adds 12 inches to your window height for roller wrap at no charge.
Measuring for window treatments is much easier than most people think. Here are five important things to remember. Please be sure to read the specific measuring instructions linked below before ordering too.
Before taking any measurements, step back from your window and decide if you want to mount the window treatment inside the window recess or outside on the wall or moulding. For an inside mount, the window opening must have enough unobstructed depth to allow mounting.

Tips:
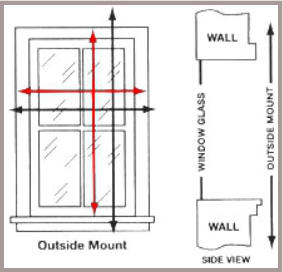
Black Arrow represents Wall Mount
Red Arrow represents Trim Mount
The factory will make the blind to your measurements, there are no deductions for an outside mount.
Width
Wall Mount: Measure the width of the window opening. If there is room, add between 3″ to 6″ on each side of the window opening to ensure a minimum light gap. Round this number to the nearest 1/8th of an inch.
Trim Mount: Measure the trim’s width from the outside edge on each side, left to right. Make sure the trim is flat and solid at the far edges because the blind mounts will be at each end of the headrail. Round this number to the nearest 1/8th of an inch.
Height
Wall Mount: Measure the height of the window opening from top to bottom and add 3″ to 6″ to this number. You must add a minimum of 2 1/2″ in height to allow for mounting brackets above the opening, the rest is added for desired overlap at the bottom.
Trim Mount: Measure the trim’s outside edge from top to bottom. Make sure the trim provides a flat space so you can mount the blind to it. Note: If the window sill protrudes at the bottom of the window, measure to the top of the sill in three places and take the maximum value.
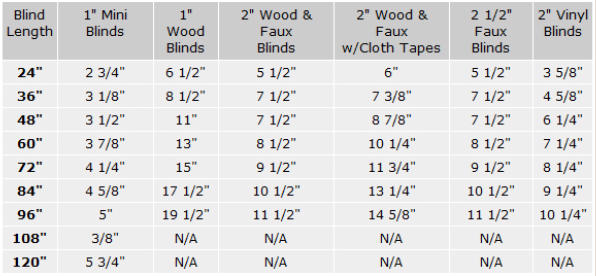
Stack Height for Horizontal Blinds: All sizes shown below are APPROXIMATE. The stack heights include the headrail and bottom rail.
Stack Height for Window Shades: All sizes shown below are APPROXIMATE. The stack heights include the headrail.
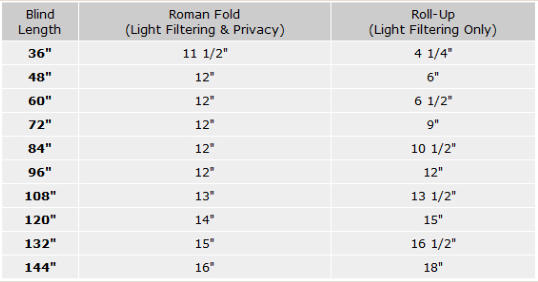
Stack Height for Roman Shades: All sizes shown below are APPROXIMATE. The stack heights include the headrail.
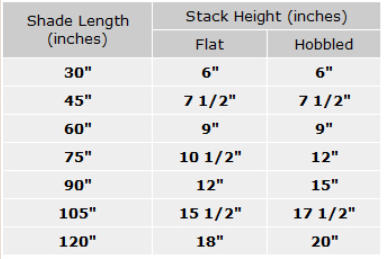
Note: Stacking height will vary by material
Measuring for Inside Mount Horizontal Blinds and Shades
General Measuring Notes: Always use a steel measuring tape. You need to measure every window, even if it is in the same room. Measure down to the nearest eighth of an inch. If you have any questions about measuring be sure to call us at 1-800-627-7117.
Valances are made slightly larger than the window for Inside Mounts. This is to cover any gaps that may be present between the blind and window due to the bracket. If you are ordering a flush Inside Mount, please specify in the notes section of the order form that you want the valance smaller to fit into the window opening.
Configure Examples:
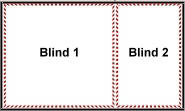
2 blinds of equal width

2 blinds of unequal width
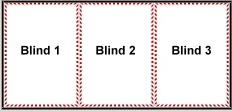
3 blinds of unequal width
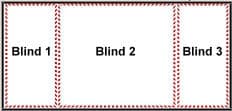
3 blinds with 1 blind unequal
Measuring for Bay Windows can be an easy task if you follow our directions. Generally, even with the most precise measurements there will be light/privacy gaps in the corners. This should not be considered a measuring mistake. It happens because when two blinds or shades meet in a corner only the front edges meet up and the blind or shade itself is normally slightly smaller in width than the headrail. To start measuring you need the depth of the bracket/headrail for the blinds type you wish to use. Select the product you are using in the Bay Window and write down the depth value associated with it.
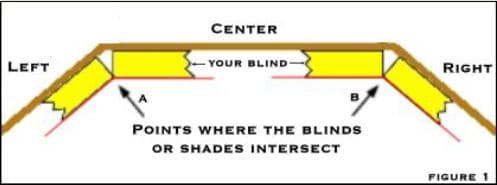
Now to measure the widths of each blind needed for the Bay Window.
Outside Mount
Blind 1 on 1st Window (The “Pass” Blind)
Blind 2 on 2nd Window (The “Butt” Blind)
Inside Mount
Blind 1 on 1st Window (The “Pass” Blind)
Blind 2 on 2nd Window (The “Butt” Blind)
Black Arrow represents Wall Mount
Red Arrow represents Trim Mount
The factory will make the blind to your measurements, there are no deductions for an outside mount.
Width
Wall Mount: Measure the width of the window opening. If there is room, add between 3″ to 6″ on each side of the window opening to ensure a minimum light gap. Round this number to the nearest 1/8th of an inch.
Trim Mount: Measure the trim’s width from the outside edge on each side, left to right. Make sure the trim is flat and solid at the far edges because the blind mounts will be at each end of the headrail. Round this number to the nearest 1/8th of an inch.
Height
Wall Mount: Measure the height of the window opening from top to bottom and add 3″ to 6″ to this number. You must add a minimum of 2 1/2″ in height to allow for mounting brackets above the opening, the rest is added for desired overlap at the bottom.
Trim Mount: Measure the trim’s outside edge from top to bottom. Make sure the trim provides a flat space so you can mount the blind to it. Note: If the window sill protrudes at the bottom of the window, measure to the top of the sill in three places and take the maximum value.
Measuring for Inside Mount Horizontal Blinds and Shades
General Measuring Notes: Always use a steel measuring tape. You need to measure every window, even if it is in the same room. Measure down to the nearest eighth of an inch. If you have any questions about measuring be sure to call us at 1-800-825-1470.
Valances are made slightly larger than the window for Inside Mounts. This is to cover any gaps that may be present between the blind and window due to the bracket. If you are ordering a flush Inside Mount, please specify in the notes section of the order form that you want the valance smaller to fit into the window opening.
Configure Examples:
2 blinds of equal width
2 blinds of unequal width
3 blinds of unequal width
3 blinds with 1 blind unequal
Measuring for Bay Windows can be an easy task if you follow our directions. Generally, even with the most precise measurements there will be light/privacy gaps in the corners. This should not be considered a measuring mistake. It happens because when two blinds or shades meet in a corner only the front edges meet up and the blind or shade itself is normally slightly smaller in width than the headrail. To start measuring you need the depth of the bracket/headrail for the blinds type you wish to use. Select the product you are using in the Bay Window and write down the depth value associated with it.
Now to measure the widths of each blind needed for the Bay Window.
Outside Mount
Blind 1 on 1st Window (The “Pass” Blind)
Blind 2 on 2nd Window (The “Butt” Blind)
Inside Mount
Blind 1 on 1st Window (The “Pass” Blind)
Blind 2 on 2nd Window (The “Butt” Blind)
You may choose how wide and long you want your blind since the blind will not fit inside the window frame. Just be sure to watch for obstructions like dead bolts, door knobs, etc. There needs to be room to mount hold-down brackets. Measure at least 2″ wider than the glass for width and 2″ to 5″ longer than the height (for brackets to mount above and below). To prevent your blind from bouncing off the door when opening and closing, be sure to order our free hold-down brackets.
Measuring for Perfect Arch Top Blinds and Shades is very easy. Make sure you use a steel tape measure for all measurements.Measure the width of the window opening at the bottom part of the window to the nearest 1/8th of an inch. This is the only measurement you need to make since the height is 1/2 of this width on a Perfect Arch Top. Note: The width is shown in the diagram to the right.
Accurate measurements are essential for shutters to fit properly. Be sure to use a quality steel tape. Measuring all windows, even though they may appear to be identical. When specifying measurements, state width first and then height. All measurements should be in inches and measured to an accuracy of 1/8th of an inch. For outside mounts, measurements should be finished. There are several things to remember when measuring for our Custom Wood Shutters.
Measure the depth of the window to determine louver clearance, this value will be needed when ordering shutters. This depth determines which louver you can use when selecting an Inside Mount. 2 3/8″ Louvers can be used on depths of 2″ and greater where 3 3/8″ louvers can be used on depths of 2 1/2″ and greater.
When measuring for width and height, always measure in three places (along the top, middle and bottom for width and at the left, center and right for the height) and give the smallest/tightest value. This allows you to accommodate openings that are not perfectly square.
On inside mount window applications, the factory will take a specific 1/8″ deduction from the opening size.
On outside mount openings, the factory will build the shutter unit (panels and frames) to your exact width and height specifications to the outside edge of the frame.
Inside mount applications require diagonal measurements to check if the window opening is square. If the diagonal measurements differ by 1/2″ or greater, ABB recommends installing an outside mount shutter to make up for the discrepancy or consider using a Z-Frame (The Z-Frame will cover most spacing gaps caused by a non-square window opening).
It is important that exact window measurements be taken before ordering Custom Wood Shutters. Once the order is confirmed, the order may not be canceled.
Divider Rail Placement (If Required)The optimal placement for the divider rail is the exact center of the panel. Shutters that are over 60″ in height must have a divider rail. There is a minimum distance of 20″ and a maximum distance of 60″ from the center of the divider rail to the top and bottom of the shutter panel. To specify your divider rail location:
Note: Divider rail location may vary by 1/8″ due to computer equal spacing of the louvers.
Matching Divider Rail Locations on Windows of Different Heights
Some of our blinds and shades have the option to get cutouts on one or both sides of them. A cutout is specified when a section of the blind needs to be cutout to allow clearance for obstacles (i.e. Door handles, window cranks, bolts, etc.) that may be in the way of the blinds.
The Image shows the outline of a blind in a window and where a cutout would be placed on that blind to avoid the window crank. The width and height are the measurements of the cutout size needed.
To specify a cutout you need to measure and note the following: